Ewkoll

  • 首页

  • 归档

Linux通过ODBC连接MYSQL

发表于 2019-06-11

安装UnixODBC

YUM 直接安装

1、yum install unixODBC-devel

下载包安装

1
2
3
4
5
6
7
8
9
tar zxvf unixODBC-2.3.0.tar.gz
./configure --prefix=/usr/localunixODBC-2.3.0 \
--includedir=/usr/include \
--libdir=/usr/lib \
--bindir=/usr/bin \
--sysconfdir=/etc
make && make install

odbcinst -j

安装MYSQL的驱动文件

yum -y install mysql-connector-odbc

cat /etc/odbcinst.ini # 查看驱动程序信息
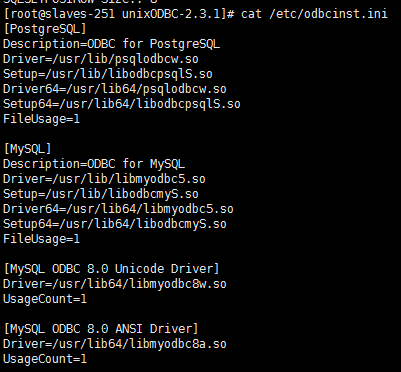
配置ODBC驱动

vim /etc/odbc.ini

1
2
3
4
5
6
7
8
9
10
11
12
[mysql_229]
Description = mysql
Driver = MySQL ODBC 8.0 ANSI Driver
Server = 192.168.7.229
Database = test
Port = 3306
USER = test
Password = test
Socket =
Option =
Stmt =
CHARSET = UTF8

Driver 填写驱动程序信息中每种驱动的描述

测试ODBC连接情况

isql mysql_229 -v # 连接某个数据源

strace isql mysql_229 -v # 跟踪错误信息

Superset

发表于 2019-06-04
  1. 初始化虚拟环境
1
2
3
4
5
cd /d e:\Python\Superset

virtualenv env

env\Scripts\activate
  1. 安装Superset
1
2
3
4
5
6
7
8
9
10
11
12
13
14
15
16
17
18
19
20
21
22
23
24
25
26
27
28
29
30
31
32
33
34
35
36
37
38
39
40
41
42
43
44
45
# 使用豆瓣的源

pip install superset -i https://pypi.douban.com/simple

简单验证安全层(Simple Authentication Security Layer,Sasl)WHL文件

# 安装最新的PIP

pip install --upgrade setuptools pip

# 遇到Was unable to import superset Error: cannot import name '_maybe_box_datetimelike' from 'pandas.core.common'

# 查看当前 pandas 版本

$ pip list | findstr pandas

pandas 0.24.2

# 安装低版本 pandas

$ pip install pandas==0.23.4

# 安装低版本 SQLAlchemy

$ pip install SQLAlchemy==1.2.18

# 创建管理员账户
fabmanager create-admin --app superset

# 切换到superset的bin目录

# Initialize the database
python superset db upgrade

# Load some data to play with
python superset load_examples

# Create default roles and permissions
python superset init

# To start a development web server on port 8088, use -p to bind to another port
python superset runserver -d

pip freeze > requirements.txt
pip install -r requirements.txt

Http杂项

发表于 2019-05-28

CORS

Nginx在同个IP配置多个域名Https问题

Python杂项

发表于 2019-05-28 | 更新于 2019-05-29

常识

Convention

__foo__: 这只是一种约定,是Python系统使用不会与用户名冲突的名称的一种方式。

__foo: 这具有实际意义:解释器将此名称替换_classname__foo为确保名称不会与另一个类中的类似名称重叠的方式。

_foo: 这只是一种约定,是程序员指示变量是私有的一种方式(无论在Python中是什么意思)。

1
2
3
4
5
6
7
8
9
10
11
12
13
14
15
16
17
18
19
20
21
22
23
24
25
26
27
28
29
30
31
32
33
34
35
36
37
38
39
40
41
42
43
44
class DoubleLine(object):
"""
双下划线的类变量,实例变量会自动转换成_classname__variable的形式。
"""
__class_variable = 100

def __init__(self):
self.__instance_variable = 101
self.__setattr__('_DoubleLine__local', 102)
object.__setattr__(self, '_DoubleLine__local2', 103)

def to_dict(self):
return self.__dict__

def list_all_member(self):
for name, value in vars(self).items():
print('%s=%s' % (name, value))

def dir_all_attr_and_func(self):
for value in dir(self):
print(value)

def test(self):
print(self.__local)
print(self.__local2)
print(self.__class_variable)
print(self.__instance_variable)
try:
print(self.__localdynamic_add)
print(self._DoubleLine__local2)
except Exception as exception:
print(exception)


dl = DoubleLine()
dl._DoubleLine__localdynamic_add = 99
print(dl.to_dict())

dl.list_all_member()
dl.dir_all_attr_and_func()
dl.test()
print(dl._DoubleLine__class_variable)
print(dl._DoubleLine__instance_variable)
print(dl.__instance_variable) # 异常提示属性不存在。

线程

Py3中原始的线程引用_thread模块。

local 线程局部变量。

1
2
3
4
5
6
7
8
9
10
11
12
13
14
15
16
17
18
19
20
21
22
23
24
25
26
27
28
29
from threading import local
import time
import _thread as thread # 等于在PY2中的原始线程。

def print_time(threadName, delay):
# 为线程定义一个函数,线程局部变量。
thread_local_data = local()
thread_local_data.count = 0
count = 0
while count < 5:
time.sleep(delay)
count += 1
thread_local_data.count += 1
print("%s: %s count: %s" % (threadName, time.ctime(time.time()), thread_local_data.count))
print("%s: count: %s exit" % (threadName, thread_local_data.count))

def empty_thread():
print("empty_thread")

# 创建三个线程
try:
thread.start_new_thread(empty_thread, ())
thread.start_new_thread(print_time, ("Thread-1", 2))
thread.start_new_thread(print_time, ("Thread-2", 3))
except:
print("Error: unable to start thread")

while 1:
time.sleep(1)

python 默认参数创建线程后,不管主线程是否执行完毕,都会等待子线程执行完毕才一起退出,有无join结果一样

如果创建线程,并且设置了daemon为true,及threading.setDaemon(True),则主线程执行完毕后自动退出,不会等待子线程的执行结果。而且随着主线程的退出,子线程也消亡

join方法的作用是阻塞,等待子线程结束,join方法有一个参数是timeout,即如果主线程等待timeout,子线程还没有结束,则主线程强制结束子线程。

如果线程daemon属性为False,则join里的timeout参数无效,主线程会一直等待子线程结束。

如果线程daemon属性为True,则join里的timeout参数是有效的,主线程会等待timeout时间后,结束子线程。

1
2
3
4
5
6
7
8
9
10
11
12
13
14
15
16
17
18
19
20
21
22
23
24
25
26
27
28
29
30
31
32
33
34
35
36
37
38
39
40
41
42
43
44
45
46
47
48
49
50
51
52
53
54
55
56
57
58
59
60
61
62
from threading import local, Thread
import time
import random

exitFlag = False

class TaskThread(Thread):

def __init__(self, thread_name, counter, delay):
Thread.__init__(self)
self.thread_name = thread_name
self.counter = counter
self.delay = delay

def run(self):
print("Starting " + self.thread_name)
self.internal_run()
print("Exiting " + self.thread_name)

def internal_run(self):
global exitFlag
while self.counter:
if exitFlag:
break
time.sleep(self.delay)
print("%s: %s" % (self.thread_name, time.ctime(time.time())))
self.counter -= 1

threads = []
thread1 = TaskThread("Thread-1", 5, 1)
thread2 = TaskThread("Thread-2", 5, 2)

thread1.start()
thread2.start()
threads.append(thread1)
threads.append(thread2)

time.sleep(3)
exitFlag = True

for item in threads:
item.join()
print("Exit")

def doThreadTest(delay):
print('start thread time:', time.strftime('%H:%M:%S'))
print(delay)
time.sleep(delay)
print('stop thread time:', time.strftime('%H:%M:%S'))

threads = []
for i in range(3):
t = Thread(target=doThreadTest, args=(random.randint(1, 5), ))
# t.setDaemon(True) # 设置后主线程退出,子线程跟随退出。
threads.append(t)

for t in threads:
t.start()

for t in threads:
t.join(1)
print('stop main thread')

互斥锁

1
2
3
4
5
6
7
8
9
10
11
12
13
14
15
16
17
18
19
20
21
22
23
24
25
26
27
28
29
30
31
32
33
34
35
import threading
import os
import time

class Ticket():
def __init__(self, count):
self.ticket = {'ticket': count}

def check_ticket(self):
print('剩余{}票'.format(self.ticket['ticket']))

def deal_ticket(self):
if self.ticket['ticket'] > 0:
self.ticket['ticket'] -= 1
print('%s购票成功' % threading.current_thread().ident)
else:
print('%s购票失败' % threading.current_thread().ident)

def buy_ticket(self, locks):
locks.acquire()
self.check_ticket()
self.deal_ticket()
locks.release()


locks = threading.Lock()
ticket = Ticket(10)
threads = []
for i in range(11):
t = threading.Thread(target=ticket.buy_ticket, args=(locks,))
t.start()
threads.append(t)

for item in threads:
item.join()

信号量

1
2
3
4
5
6
7
8
9
10
11
12
13
14
15
16
17
18
import threading
import time
count = threading.active_count()

def run(n):
semaphore.acquire()
time.sleep(1)
print('run the thread:%s\n' % n)
semaphore.release()

semaphore = threading.BoundedSemaphore(5)
for i in range(20):
threading.Thread(target=run, args=(i,)).start()

while threading.active_count() != count:
time.sleep(1)
else:
print('over')

事件

1
2
3
4
5
6
7
8
9
10
11
12
13
14
15
16
17
18
19
20
21
22
23
24
25
26
27
28
29
30
31
32
33
34
import time
import threading

event = threading.Event()
event.set()

def Lighter():
count = 0
while True:
if count > 10 and count < 20:
event.clear()
print('Red Light')
elif count > 20:
count = 0
event.set()
else:
print('Green Light')
time.sleep(1)
count += 1

def Car():
while True:
if event.is_set():
print('Running..')
time.sleep(1)
else:
print('Red Light Waitting')
event.wait()

light = threading.Thread(target=Lighter)
car = threading.Thread(target=Car)
light.start()
car.start()
light.join()

类常识

  1. 常识,静态语言不能支持2个相同名字的变量。
1
2
3
4
5
6
7
8
9
class Attr(object):
class_variable = "类变量" # 等价于Class中申明Static变量
def __init__(self):
self.attribute_variable = "属性变量" # 等价于成员变量
self.class_variable = "属性变量-冲突测试" # 当没有定义__slots__的时候不会冲突。

a = Attr()
print(a.class_variable) # 属性变量-冲突测试
print(Attr.class_variable) # 类变量,访问静态成员变量,这个也是静态语言不能实现的。

冲突,具体跟Python针对slots的实现处理方式有关。

1
2
3
4
5
6
7
class Attr(object):
#__slots__ = ('age')
__slots__ = () # 只要有定义就会冲突。

Attr.age = 99 # 绑定类变量。
a = Attr()
a.age = 100 # 'Attr' object attribute 'age' is read-only 当定义了__slots__后,不能和类变量冲突。
  1. __slots__ 定义和类变量冲突问题。
1
2
3
class Attr(object):
class_variable = "类变量" # 等价于Class中申明Static变量
__slots__ = ('class_variable') # 'class_variable' in __slots__ conflicts with class variable 冲突。
1
2
3
4
5
6
class Attr
{
public:
static std::string g_class_variable;
std::string g_class_variable; //编译提示重定义。
};
  1. __slots__完成对实例变量绑定的限制。【限制是类的实例-这个说法应该是不精确的】
1
2
3
4
5
6
7
8
class Attr(object):
class_variable = "类变量"
__slots__ = ('attr_info')
def __init__(self):
# 限制属性变量的绑定, 'Attr' object has no attribute 'attribute_variable'
self.attribute_variable = "属性变量"

a = Attr()

类定义外部绑定属性也会同样的问题。

1
2
3
4
5
class Attr(object):
__slots__ = ()

a = Attr()
a.other = "'Attr' object has no attribute 'other'"
  1. __slots__ 完成对实例成员函数绑定的限制。
1
2
3
4
5
6
7
8
def set_age(self, age):
self.age = age

class Attr(object):
__slots__ = ()

a = Attr()
a.set_age = MethodType(set_age, Attr) #'Attr' object has no attribute 'set_age'
  1. __slots__不限制对class全局变量(类变量)绑定的添加。
1
2
3
class Attr(object):
__slots__ = ()
Attr.set_age = "'Attr' object attribute 'set_age' is read-only"
  1. MethodType绑定到类方法后的行为。
1
2
3
4
5
6
7
8
9
10
11
12
13
14
15
16
17
18
19
20
21
22
23
24
25
26
27
28
29
30
31
32
33
34
35
36
37
38
39
40
41
42
43
44
45
46
47
48
def set_name(self, name):
self.name = name

class Attr(object):
__slots__ = ('set_name')

a = Attr()
# 绑定到类中,执行set_name方法添加的self.name是添加到类变量中。
# Attr.set_name = MethodType(set_name, Attr)
# 绑定到实例方法中去,这个属性绑定会被__slots__的设置限制,
# 执行set_name方法添加的self.name也是同样会添加到类变量中。
# a.set_name = MethodType(set_name, Attr)
# a.set_name('Ewkoll') # 这里会提示异常,因为__slots__中没有name。
# print(a.name)
# print(Attr.name)

# 绑定实例函数到实例上,受到__slots__控制。
a.set_name = MethodType(set_name, a)
a.set_name('Ewkoll') # 这里会提示异常,因为__slots__中没有name。当__slots__中有name的时候,添加的是成员变量。
print(a.name)
print(Attr.name) #<member 'name' of 'Attr' objects>

# 绑定到类的方法中。不受到__slots__控制。但是name属性的设置只有a实例拥有
Attr.set_name1 = MethodType(set_name, a)

a = Attr()
Attr.set_name = MethodType(set_name, a)
b = Attr()
print(Attr.name)
# print(b.name) # 异常没有属性变量 name
# b.name = "异常
b.set_name('Ewkoll') # 这里设置的name是类变量。
# print(b.name) # 异常没有属性变量 name

a = Attr()
Attr.set_name = MethodType(set_name, a)
a.set_name('Ewkoll')
print(a.name)
Attr.name = "32"
# a.name = "99" # "异常,类变量name是只读的"
print(Attr.name)
print(a.name)

b = Attr()
print(Attr.name)
print(b.name)
# b.name = "异常,类变量name是只读的"
b.set_name('Ewkoll') # 异常,类变量name是只读的, a实例可以调用,但是b实例不能调用。

Flask之Local、LocalStack、LocalProxy

Local解决线程TLS(TlsAlloc)存储无法解决协助之间数据隔离问题而创建的。

解决Java字节码加密后Spring和Tomcat运行问题

发表于 2019-05-27

Mondrian

发表于 2019-04-03

1. What is a schema?

  • schema 个人理解就是一种对关系模型的描述。

  • A schema defines a multi-dimensional database. It contains a logical model, consisting of cubes, hierarchies, and members, and a mapping of this model onto a physical model. 模型形态定义了一种多维数据库,包含逻辑模型,立方体(多维数据集),层次结构,成员组成,以及这个模型到物理模型的映射。

  • The logical model consists of the constructs used to write queries in MDX language: cubes, dimensions, hierarchies, levels, and members.

  • The physical model is the source of the data which is presented through the logical model. It is typically a star schema, which is a set of tables in a relational database; later, we shall see examples of other kinds of mappings. 物理模型是通过逻辑模型呈现的数据源,它通常是星型模型,在关系型数据库中就是一系列的表。

2. Schema files

  • Mondrian schemas are represented in an XML file. An example schema, containing almost all of the constructs we discuss here, is supplied as demo/FoodMart.xml in the Mondrian distribution. The dataset to populate this schema is also in the distribution. 通过XML文件表示Mondrian模型。

  • Currently, the only way to create a schema is to edit a schema XML file in a text editor. The XML syntax is not too complicated, so this is not as difficult as it sounds, particularly if you use the FoodMart schema as a guiding example.

3. Logical model

The most important components of a schema are cubes, measures, and dimensions: 模型中最重要的组件包含:多维数据集,度量,维度。

  • A cube is a collection of dimensions and measures in a particular subject area. 一个立方体是在某个子领域维度和度量的集合

  • A measure is a quantity that you are interested in measuring, for example, unit sales of a product, or cost price of inventory items. 一个度量是一个你感兴趣需要测量的指标。

  • A dimension is an attribute, or set of attributes, by which you can divide measures into sub-categories. For example, you might wish to break down product sales by their color, the gender of the customer, and the store in which the product was sold; color, gender, and store are all dimensions. 维度是属性或者属性集。

1
2
3
4
5
6
7
8
9
10
11
12
13
14
15
16
17
18
19
20
21
22
23
24
25
26
27
28
29
30
31
<Schema>
<!-- 立方体名称 -->
<Cube name="Sales">
<!-- 事实表名称 -->
<Table name="sales_fact_1997" />
<!-- 性别维度,在事实表中的外键是customer_id,在customer表的主键是customer_id -->
<Dimension name="Gender" foreignKey="customer_id">
<Hierarchy hasAll="true" allMemberName="All Genders" primaryKey="customer_id">
<Table name="customer" />
<Level name="Gender" column="gender" uniqueMembers="true" />
</Hierarchy>
</Dimension>
<!-- 时间维度 -->
<Dimension name="Time" foreignKey="time_id">
<Hierarchy hasAll="false" primaryKey="time_id">
<Table name="time_by_day" />
<Level name="Year" column="the_year" type="Numeric" uniqueMembers="true" />
<Level name="Quarter" column="quarter" uniqueMembers="false" />
<Level name="Month" column="month_of_year" type="Numeric" uniqueMembers="false" />
</Hierarchy>
</Dimension>
<!-- 单位产品销售额度量,这个值在销售事实表中,因此决定是度量还是维度是人为定义的。-->
<Measure name="Unit Sales" column="unit_sales" aggregator="sum" formatString="#,###" />
<Measure name="Store Sales" column="store_sales" aggregator="sum" formatString="#,###.##" />
<Measure name="Store Cost" column="store_cost" aggregator="sum" formatString="#,###.00" />
<!-- 计算成员,dimension="Measures"直接说明此是度量 -->
<CalculatedMember name="Profit" dimension="Measures" formula="[Measures].[Store Sales] - [Measures].[Store Cost]">
<CalculatedMemberProperty name="FORMAT_STRING" value="$#,##0.00" />
</CalculatedMember>
</Cube>
</Schema>
1
2
3
4
SELECT {[Measures].[Unit Sales], [Measures].[Store Sales]} ON COLUMNS, 查询指标度量在列
{descendants([Time].[1997].[Q1])} ON ROWS 时间维度在行
FROM [Sales] 从多维数据集Sales
WHERE [Gender].[F] 根据性别

Gitlab相关

发表于 2019-03-25

安装

docker hub 地址
docker pull gitlab/gitlab-ce
docker pull store/gitlab/gitlab-ce:10.2.4-ce.0

1
2
3
4
5
6
7
8
9
10
11
12
sudo docker run --detach \
--hostname www.operatorworld.win \
--publish 443:443 \
--publish 80:80 \
--publish 1822:22 \
--publish 8443:8443 \
--name gitlab \
--restart always \
--volume /home/Gitlab/config:/etc/gitlab \
--volume /home/Gitlab/logs:/var/log/gitlab \
--volume /home/Gitlab/data:/var/opt/gitlab \
store/gitlab/gitlab-ce:10.2.4-ce.0

中文版本

1
2
3
4
5
6
7
8
9
10
11
12
13
14
15
16
17
18
19
20
21
22
23
获取当前Docker中的安装版本
gitlab_version=$(cat /opt/gitlab/embedded/service/gitlab-rails/VERSION)

Clone对应全镜像
git clone https://gitlab.com/xhang/gitlab.git

切换目录
cd gitlab

生成对应版本的中文对比文件
git diff v${gitlab_version} v${gitlab_version}-zh > ../${gitlab_version}-zh.diff

停止Gitlab
gitlab-ctl stop

导入汉化文件
patch -d /opt/gitlab/embedded/service/gitlab-rails -p1 < ../11.0.1-zh.diff

重配置
gitlab-ctl reconfigure

然后启动gitlab
gitlab-ctl start

Hive相关

发表于 2019-03-14 | 更新于 2019-03-15

Hive

  1. 解压设置环境变量
    tar -zxvf apache-hive-2.3.4-bin.tar.gz

export HIVE_HOME=/home/hive/apache-hive-2.3.4-bin
export HIVE_CONF_DIR=$HIVE_HOME/conf
export PATH=$HIVE_HOME/bin:${PATH}

  1. 创建目录
    hadoop fs -mkdir /tmp
    hadoop fs -mkdir -p /user/hive/warehouse
    hadoop fs -chmod g+w /tmp
    hadoop fs -chmod g+w /user/hive/warehouse

  2. 修改hive配置文件
    修改${system:java.io.tmpdir}为另外的777权限下的目录。
    修改${system:user.name}为执行程序的用户名

    1
    2
    3
    4
    5
    6
    7
    8
    9
    10
    11
    12
    13
    14
    15
    16
    17
    <property
    <name>javax.jdo.option.ConnectionDriverName</name
    <value>com.mysql.jdbc.Driver</value>
    </property>
    <property>
    <name>javax.jdo.option.ConnectionURL</name>
    <!--<value>jdbc:derby:;databaseName=metastore_db;create=true</value>-->
    <value>jdbc:mysql://192.168.7.229:3306/hive?createDatabaseIfNotExist=true&amp;useSSL=false</value>
    </property>
    <property>
    <name>javax.jdo.option.ConnectionUserName</name>
    <value>root</value>
    </property>
    <property>
    <name>javax.jdo.option.ConnectionPassword</name>
    <value>*******</value>
    </property>

XML中配置JDBC连接符号中&需要转义成&

最后需要把MYSQL的连接驱动JDBC包放到Hive对应的Lib目录下。地址

  1. 初始化数据库
    schematool -dbType mysql -initSchema

  2. 测试
    hive命令启动,默认配置创建的数据库在当前程序在的目录。
    hiveserver2
    beeline -u jdbc:hive2://localhost:10000

  3. DML操作
    LOAD DATA LOCAL INPATH ‘./examples/files/kv1.txt’ OVERWRITE INTO TABLE pokes;
    载入用ctrl-a分隔的文件。
    LOCAL 没有指定将会从HDFS查找文件,如果有将移动到Hive所在的命名空间目录下。
    OVERWRITE 表示存在的数据将会被删除,如果没有设置将会追加数据在表下。
    Load命令不验证数据。
    在载入数据前,先在HDFS创建好对应hive配置的目录。

Apache Kylin

发表于 2019-03-12 | 更新于 2019-03-19

提供Hadoop/Spark之上的SQL查询接口及多维分析能力以支持超大规模数据,亚秒内查询巨大的Hive表。

Kylin实现秒级查询的关键点是预计算,对于超大数据集的复杂查询,既然现场计算需要花费较长时间,那么根据空间换时间的原理,我们就可以提前将所有可能的计算结果计算并存储下来,把高复杂度的聚合运算、多表连接等操作转换成对预计算结果的查询,比如把本该进行的Join、Sum、CountDistinct等操作改写成Cube的查询操作。从而实现超大数据集的秒级多维分析查询。
-简单的说就是把要计算的指标先计算后存储到数据库,然后提供查询机制。

REST Server:
REST Server是一套面向应用程序开发的入口点,旨在实现针对Kylin平台的应用开发工作。 此类应用程序可以提供查询、获取结果、触发cube构建任务、获取元数据以及获取用户权限等等。 另外可以通过Restful接口实现SQL查询。

查询引擎(Query Engine):
当cube准备就绪后,查询引擎就能够获取并解析用户查询。它随后会与系统中的其它组件进行交互,从而向用户返回对应的结果。
在Kylin当中,我们使用一套名为Apache Calcite的开源动态数据管理框架对代码内的SQL以及其它插入内容进行解析。

Routing
负责将解析的SQL生成的执行计划转换成cube缓存的查询,cube是通过预计算缓存在hbase中,这部分查询可以在秒级设置毫秒级完成,而且还有一些操作使用过的查询原始数据(存储在Hadoop的hdfs中通过hive查询)。这部分查询延迟较高。

元数据管理工具(Metadata Manager)
Kylin是一款元数据驱动型应用程序。元数据管理工具是一大关键性组件,用于对保存在Kylin当中的所有元数据进行管理,其中包括最为重要的cube元数据。其它全部组件的正常运作都需以元数据管理工具为基础。 Kylin的元数据存储在hbase中。

任务引擎(Cube Build Engine):
这套引擎的设计目的在于处理所有离线任务,其中包括shell脚本、Java API以及Map Reduce任务等等。任务引擎对Kylin当中的全部任务加以管理与协调,从而确保每一项任务都能得到切实执行并解决其间出现的故障。其实就是任务调度和分配。

存储引擎(Storage Engine)
这套引擎负责管理底层存储——特别是cuboid,其以键-值对的形式进行保存。存储引擎使用的是HBase——这是目前Hadoop生态系统当中最理想的键-值系统使用方案。Kylin还能够通过扩展实现对其它键-值系统的支持,例如Redis。

Kylin的三大依赖模块分别是数据源、构建引擎和存储引擎。默认这三者分别是Hive、MapReduce和HBase。但随着推广和使用的深入,渐渐有用户发现它们均存在不足之处。比如,实时分析可能会希望从Kafka导入数据而不是从Hive;而Spark的迅速崛起,又使我们不得不考虑将MapReduce替换为Spark,以期大幅提高Cube的构建速度;至于HBase,它的读性能可能还不如Cassandra或Kudu等。因此Kylin1.5版本的系统架构进行了重构,将数据源、构建引擎、存储引擎三大依赖抽象为接口,而Hive、MapReduce、HBase只是默认实现。深度用户可以根据自己的需要做二次开发,将其中的一个或多个替换为更适合的技术。

  1. 百亿规模数查询效率
  2. 支撑大部分查询SQL功能
  3. 定义数据模型构建立方体

支撑的BI工具

  1. Tableau
  2. MSTR
  3. QlikSense
  4. Superset-开源
  5. Hue-开源

其它一些BI工具

  1. grafana 是一个开源的时序性统计和监控平台-时间序列。
  2. [Superset] 静态报表更好。
  3. [FineBI] 国内商业BI报表。
  4. Davinci 宜信技术研发中心-数据源MYSQL-CSV文件
  5. Zeppelin 可以跟Spark结合,开源项目
  6. Franchise 看不出什么优点
  7. Redash 开源项目

基本概念

  1. OLAP(On-line Analytical Processing) Cube 多维模型中事实表(Fact Table)。
  2. OLAP的多维分析操作包括:钻取(Drill-down)、上卷(Roll-up)、切片(Slice)、切块(Dice)、旋转(Pivot)。
  3. 度量(Measure)用于描述事件的数字尺度。
  4. 计算度量(Calculated Measure)通过度量计算后的结果,比如:同比利润,环比利润,利率变化。
  5. 自上而下的钻取、自下而上地聚合。
  6. 维(Dimension)、层次(Hierarchy)
  7. LDAP(Lightweight Directory Access Protocol)轻量目录访问协议。
  8. SSO(Single sign-on)单一登录。
  9. HyperLogLog基数统计,去重后结果总数。

ROLAP、MOLAP和HOLAP联机分析处理区别

  1. ROLAP(Relational OLAP) 关系型数据库联机分析 - 特点是将细节数据保留在关系型数据库的事实表中,聚合后的数据也保存在关系型的数据库中。
  2. MOLAP(Multidimensional OLAP) 多维数据联机分析(KYLIN)- 特点是将细节数据和聚合后的数据均保存在cube中,所以以空间换效率,查询时效率高,但生成cube时需要大量的时间和空间。
  3. HOLAP(Hybrid OLAP) 混合数据组织OLAP实现 - 特点是将细节数据保留在关系型数据库的事实表中,但是聚合后的数据保存在cube中,聚合时需要比ROLAP更多的时间,查询效率比ROLAP高,但低于MOLAP。

每个维度至少使用一个表在存放堆数据,成员等描述信息,维度和事实表通过主关键字和外关键字形成星型模式,多个表来描述星型模型扩展称为雪花模型。
星型模式的Hive表,个人理解就是事实表数据,对应的就是关系型数据结果。

其它概念

  1. Data Warehouse 数据仓库
  2. Business Intelligence 商业智能
  3. Star Schema 星型模型
  4. Fact Table 事实表
  5. Lookup Table 查找表
  6. Dimension 维度(人,产品,地点和时间)
  7. Measure 度量(例如,总和,计数,平均值,最小值,最大值)的属性
  8. Table - This is definition of hive tables as source of cubes, which must be synced before building cubes. 这是将hive表定义为多维数据集的源,必须在构建多维数据集之前同步。
  9. Data Model - This describes a STAR SCHEMA data model, which defines fact/lookup tables and filter condition. 数据模型 - 它描述了一个STAR SCHEMA数据模型,它定义了事实/查找表和过滤条件。
  10. Cube Descriptor - This describes definition and settings for a cube instance, defining which data model to use, what dimensions and measures to have, how to partition to segments and how to handle auto-merge etc. 描述多维数据集实例的定义和设置,定义要使用的数据模型,具有的维度和度量,如何分区到段以及如何处理自动合并等。
  11. Cube Instance - This is instance of cube, built from one cube descriptor, and consist of one or more cube segments according partition settings. 这是多维数据集的实例,由一个多维数据集描述符构建,并根据分区设置由一个或多个多维数据集段组成。
  12. Partition - User can define a DATE/STRING column as partition column on cube descriptor, to separate one cube into several segments with different date periods.用户可以将DATE / STRING列定义为多维数据集描述符上的分区列,以将一个多维数据集分成具有不同日期段的多个段。
  13. Cube Segment - This is actual carrier of cube data, and maps to a HTable in HBase. One building job creates one new segment for the cube instance. Once data change on specified data period, we can refresh related segments to avoid rebuilding whole cube. 这是多维数据集数据的实际载体,并映射到HBase中的HTable。一个构建作业为多维数据集实例创建一个新段。一旦数据在指定数据期间发生变化,我们就可以刷新相关的段以避免重建整个多维数据集。
  14. Aggregation Group - Each aggregation group is subset of dimensions, and build cuboid with combinations inside. It aims at pruning for optimization. 每个聚合组都是维度的子集,并使用内部组合构建长方体。它旨在修剪优化。

基本结构

  1. Kylin从Hadoop、Hive、Kafka、RDBMS、中获取数据通过Cube Build Engine构建数据立方体存储数到HBase。
  2. Kylin内部提供查询引擎对外提供数据查询接口。
  3. 元数据(Metadata)引擎,查询引擎,Job引擎及存储引擎等,同时包括REST服务器以响应客户端请求。

Kylin:从Hive查询数据。
事实表,用来存储数据和维关键字。对应则是原始数据和数据中某些关键字段值,维关键字等价于foreign key的列。(外键列)
查找表,替换运行时计算的数组索引,对事实表某些列的扩充说明字段。
事实表位于星型模型的中间,多个事实表构成事实星座图。

星型模型和雪花模式都只有一个事实表。

Measure度量,度量是一个可计算的属性,例如求和,计算数量,取平均值。
Dimenssion维,简单的理解就是提供给数据分析观察方向,X轴,Y轴。维度是对事实和度量进行分类的结构,以便使用户能够回答业务问题。通常使用的维度是人员、产品、地点和时间

银行对存款记账,A表中存放实际数据,包括账号、所属机构号、存款金额等,B表存放机构号和机构名称的对应关系。则A是事实表,B是维表。

事实表存储原始数据,某些外键可以作为维度列
查找表,其实就是那个外键的在另外一个表示主键,查找对应关系,
度量,就是把事实表中的某些可计算字段,计算出来的结果列。
维度,就是把事实表中的外键和度量计算出的结果列作为一个图表里面的横坐标轴。
维度的基数(Cardinality),指的是该维度在数据集中出现的不同值的个数;例如“国家”是一个维度,如果有200个不同的值,那么此维度的基数就是200。通常一个维度的基数会从几十到几万个不等,个别维度如“用户ID”的基数会超过百万甚至千万。基数超过一百万的维度通常被称为超高基数维度(Ultra High Cardinality,UHC),需要引起设计者的注意。

选择维度列时,维度可以来自事实表或维度表。选择度量列时,度量只能来自事实表

杂项

发表于 2019-03-07 | 更新于 2019-06-11

一些有得没得

docker run -rm 表示Automatically remove the container when it exits

docker run –privileged 表示Give extended privileges to this container

docker run -u 设置容器的用户 Username or UID (format: <name|uid>[:<group|gid>])

docker run -i, –interactive 交互性Keep STDIN open even if not attached

docker run -t, –tty 分配终端Allocate a pseudo-TTY

docker run -d, –detach 表示Run container in background and print container ID

docker build –network string 表示构建时候网络Set the networking mode for the RUN instructions during build (default “default”)

groupadd group_docker
usermod -s /sbin/nologin user_docker
useradd -s /sbin/nologin -g group_docker user_docker
yum install net-tools

删除文件恢复
git status
git reset HEAD
git checkout .

更新时间
ntpdate time.windows.com

修改时区
ln -sf /usr/share/zoneinfo/Asia/Shanghai /etc/localtime

时区选择
tzselect

JDBC问题
访问最新8.0.15版本的MYSQL使用5.1.24的JDBC会出现异常java.math.BigInteger cannot be cast to java.lang.Integer

删除无用文件

1
2
3
4
5
6
7
8
9
10
11
12
13
14
15
16
17
18
19
20
21
22
23
24
25
26
27
28
29
30
31
32
33
34
35
36
37
38
39
40
41
42
43
44
45
46
47
48
49
50
51
52
53
54
55
56
57
58
59
60
61
62
63
64
65
66
67
68
69
@echo off
setlocal enabledelayedexpansion
set today=%date:~4,10% %time:~0,8%
set path=%cd%

echo %today% >> delete.log
echo ***start delete*** >> delete.log

set a0=".tmp"
set a1="._mp"
set a2=".log"
set a3=".gid"
set a4=".chk"
set a5=".old"
set a6=".obj"
set a7=".idb"
set a8=".pdb"
set a9=".tlog"
for /r %path% %%s in (*.tmp, *._mp, *.log, *.gid, *.chk, *.old, *.obj, *.idb, *.pdb, *.tlog) do (
set var=%%s
set suffix=!var:~-4,4!
if "!suffix!"==%a0% (
>> filelists.txt echo %%s
)
if "!suffix!"==%a1% (
>> filelists.txt echo %%s
)
if "!suffix!"==%a2% (
>> filelists.txt echo %%s
)
if "!suffix!"==%a3% (
>> filelists.txt echo %%s
)
if "!suffix!"==%a4% (
>> filelists.txt echo %%s
)
if "!suffix!"==%a5% (
>> filelists.txt echo %%s
)
if "!suffix!"==%a6% (
>> filelists.txt echo %%s
)
if "!suffix!"==%a7% (
>> filelists.txt echo %%s
)
if "!suffix!"==%a8% (
>> filelists.txt echo %%s
)
set suffix=!var:~-5,5!
if "!suffix!"==%a9% (
>> filelists.txt echo %%s
)
)

set count=0
set /p choice=please select after check filelists.txt(y.Yes n.No)
If /i %choice%==y (
for /f "delims=" %%i in (filelists.txt) do (
>> delete.log echo %%i
del /f /s /q "%%i"
set /a count+=1
)
) else (
Exit
)

echo ***Successful(total: %count%)*** >> delete.log
del /f /s /q "filelists.txt"
echo= >> delete.log

清理图标缓存

1
2
3
4
5
6
7
8
9
10
11
12
13
14
15
16
17
18
19
20
21
22
23
24
25
26
27
rem close explorer.exe

taskkill /f /im explorer.exe

rem clean icon db

attrib -h -s -r "%userprofile%\AppData\Local\IconCache.db"

del /f "%userprofile%\AppData\Local\IconCache.db"

attrib /s /d -h -s -r "%userprofile%\AppData\Local\Microsoft\Windows\Explorer\*"

del /f "%userprofile%\AppData\Local\Microsoft\Windows\Explorer\thumbcache_32.db"
del /f "%userprofile%\AppData\Local\Microsoft\Windows\Explorer\thumbcache_96.db"
del /f "%userprofile%\AppData\Local\Microsoft\Windows\Explorer\thumbcache_256.db"
del /f "%userprofile%\AppData\Local\Microsoft\Windows\Explorer\thumbcache_1024.db"
del /f "%userprofile%\AppData\Local\Microsoft\Windows\Explorer\thumbcache_idx.db"
del /f "%userprofile%\AppData\Local\Microsoft\Windows\Explorer\thumbcache_sr.db"

rem clean TrayNotify

echo y|reg delete "HKEY_CLASSES_ROOT\Local Settings\Software\Microsoft\Windows\CurrentVersion\TrayNotify" /v IconStreams
echo y|reg delete "HKEY_CLASSES_ROOT\Local Settings\Software\Microsoft\Windows\CurrentVersion\TrayNotify" /v PastIconsStream

rem restart explorer.exe

start explorer

代理插件下载地址Proxy SwitchyOmega

Windows开始窗口默认显示10列,右键-属性-开始菜单-自定义修改

Git 设置Socks5代理

1
2
3
4
5
6
7
8
9
10
11
12
13
14
15
16
17
18
19
20
21
22
23
24
25
26
27
28
29
30
31
32
33
34
35
36
37
38
39
40
41
42
43
44
45
46
47
48
49
50
51
git remote -v

git config --global http.proxy socks5://127.0.0.1:1080
git config --global https.proxy socks5://127.0.0.1:1080

git config --global --get http.proxy
git config --global --get https.proxy

git config --global --unset http.proxy
git config --global --unset https.proxy

x/tools部分通过github下载到对应目录。
go get -u -v github.com/nsf/gocode
go get -u -v github.com/uudashr/gopkgs/cmd/gopkgs
go get -u github.com/golang/dep/cmd/dep

:: 使用git pull更新
go get -u -v github.com/ramya-rao-a/go-outline
go get -u -v github.com/acroca/go-symbols
go get -u -v github.com/josharian/impl

:: 更新tools在切换到合适的分支版本
go get -u -v golang.org/x/tools/cmd/guru
go get -u -v golang.org/x/tools/cmd/gorename

go get -u -v github.com/fatih/gomodifytags
go get -u -v github.com/haya14busa/goplay/cmd/goplay
go get -u -v github.com/rogpeppe/godef

go get -u -v sourcegraph.com/sqs/goreturns
go get -u -v golang.org/x/lint/golint

go get -u -v github.com/cweill/gotests/...
go get -u -v github.com/derekparker/delve/cmd/dlv

安装Golint,把下载的golint代码移动到x/tools目录下,执行对应的go install
go install github.com/nsf/gocode
go install github.com/uudashr/gopkgs/cmd/gopkgs
go install github.com/ramya-rao-a/go-outline
go install github.com/acroca/go-symbols
go install golang.org/x/tools/cmd/guru
go install golang.org/x/tools/cmd/gorename
go install github.com/fatih/gomodifytags
go install github.com/haya14busa/goplay/cmd/goplay
go install github.com/josharian/impl
go install github.com/rogpeppe/godef
go install sourcegraph.com/sqs/goreturns
go install github.com/golang/lint/golint
go install github.com/cweill/gotests/...
go install github.com/derekparker/delve/cmd/dlv
go install github.com/golang/dep/cmd/dep

vim /etc/hosts
hostname 设置主机名称

chkconfig –list
chkconfig memsql-ops off
chkconfig –del memsql-ops
yum erase postgresql95

定时任务

1
2
3
4
5
6
7
8
9
tail -f /var/log/cron 查看定时任务执行日志。

crontab -e 编辑定时任务,使用绝对路径。

crontab -l 查看当前用户下的定时任务。

* * * * * 分钟(0-59) 小时(0-23) 几号(1-31)月份(1-12)星期(0-7)

service crond restart 重启

阿里MVN配置

1
2
3
4
5
6
<mirror> 
<id>alimaven</id>
<name>aliyun maven</name>
<url>http://maven.aliyun.com/nexus/content/groups/public/</url>
<mirrorOf>central</mirrorOf>
</mirror>

Docker安装

docker ce 社区版本

docker ee 企业版本

  1. 关于centos-extras存储库开启访问此地址
  2. 开启overlay2存储驱动

Install using the repository

  1. 安装需要的包
1
2
yum install -y yum-utils \                  provides the yum-config-manager utility
device-mapper-persistent-data lvm2 required by devicemapper
  1. 设置仓库
1
2
3
yum-config-manager \
--add-repo \
https://download.docker.com/linux/centos/docker-ce.repo
  1. 安装当前最新版本的DOCKER
1
2
3
4
5
6
7
yum install docker-ce docker-ce-cli containerd.io

If prompted to accept the GPG key, verify that the fingerprint matches

060A 61C5 1B55 8A7F 742B 77AA C52F EB6B 621E 9F35,

and if so, accept it.

当你有多个Docker仓库,执行安装默认会安装最高版本的Docker。

执行完成后Docker就已经安装好,并且Docker用户组也一并创建,但是没有用户添加到组中。

  1. 安装指定版本的Docker

    列出repo中可用版本yum list docker-ce –showduplicates | sort -r

    执行更新源yum update在执行以上命令。

  1. 启动docker服务

    systemctl start docker

Install from a package

  1. 从以下地址下载对应版本的docker-ce 和 docker-ce-cli

  2. 执行安装命令 yum install ./*.rpm 把3个rpm包放在同一个目录执行即可。

  3. 安装完成执行service docker start,执行docker info。

  4. 升级docker To upgrade Docker CE, download the newer package file and repeat the installation procedure, using yum -y upgrade instead of yum -y install, and pointing to the new file.

  5. usermod -aG docker your-user 把执行用户追加到docker用户组。注销并重新登录才能生效!

Docker网络模型

Docker安装MYSQL

1
2
3
4
5
6
7
8
9
10
11
12
13
14
15
16
17
18
19
20
21
22
23
24
25
26
27
28
29
30
31
32
33
34
35
36
37
root权限创建data目录,容器启动会失败,存在数据,重新构建容器也会失败。

docker pull mysql
docker pull adminer
docker run --restart=always \
--name docker_mysql \
-e MYSQL_ROOT_PASSWORD=a123456 \
-e MYSQL_USER=cboard \
-e MYSQL_PASSWORD=cboard \
-e MYSQL_DATABASE=cboard \
-p 3306:3306 \
-d \
-v `pwd`/data:/var/lib/mysql \
-v `pwd`/conf:/etc/mysql \
mysql \
--character-set-server=utf8mb4 \
--collation-server=utf8mb4_unicode_ci \
--default-authentication-plugin=mysql_native_password

docker run --link docker_mysql:mysql --name adminer -p 8888:8080 -d --restart=always adminer

MYSQL_RANDOM_ROOT_PASSWORD=yes 将会为root用户设置随机密码。
MYSQL_ONETIME_PASSWORD=yes 将会在首次登录的时候强制更改密码。

docker run -it\
--link docker_mysql:mysql\
--rm mysql \
sh -c 'exec mysql -h"$MYSQL_PORT_3306_TCP_ADDR" -P"$MYSQL_PORT_3306_TCP_PORT" -uroot -p"$MYSQL_ENV_MYSQL_ROOT_PASSWORD"'

docker exec -it docker_mysql bash
docker logs docker_mysql
docker container rm -f docker_mysql
docker ps
dcoker container ls -a

修改MYSQL密码
ALTER USER 'root'@'%' IDENTIFIED WITH mysql_native_password BY '123456';

H2存储数据库

查看CenterOS版本

1
2
3
4
5
6
cat /etc/issue
cat /etc/redhat-release

Linux 内核版本
uname -a
cat /proc/version
123

ideath@operatorworld.com

24 日志
© 2019 ideath@operatorworld.com
由 Hexo 强力驱动 v3.8.0
|
主题 – NexT.Muse v6.4.2